THE ULTIMATE REBOOT
WEEK 2 WORKOUT
REPEAT THIS WORKOUT 3-5 DAYS DURING WEEK 2
- Day 1 : Learn
- Day 2: Improve On What You Have Learned
- Days 3 – 5: Push & Progress
EQUIPMENT NEEDED:
HEAVY DUMBELLS – 1 PAIR
KETTLEBELL – 8-10kg | 17.5-22lbs
WORKOUT STRUCTURE:
SECTION 1: 3 Minute Active Warmup
SECTION 2: 10 Minute Strength Session
SECTION 3: 4 Minute Steady State Plyo
SECTION 4: 8 Minute Steady State HIIT – Alternating Single Arm Kettlebell Swings
 IMPORTANT
Single Arm Kettlebell Swings Feature This Week.
Please ensure you have read the supporting material and have watched the tutorial BEFORE starting the program.
Try and perfect your form without a kettlebell first.
WATCH THIS VIDEO BEFORE PROCEEDING: Click the button below.
If you cannot do kettlebell swings choose anything from the list here and work for 120 sec rest for 60 sec x 3 sets
WEEK 2 WORKOUT VIDEO
GYM / WRITTEN EDITION
SECTION 1: 3 Minute Active Warmup
45 sec on 15 sec rest x 1 Set
- BODYWEIGHT
Ex1: Squat To Knee Drive
Ex2: Knee Drive Pull Downs
Ex3: Toy Soldiers
SECTION 2: 10 Minute STRENGTH
45 sec on 15 sec rest x 2 Sets
- 1 x HEAVY SET DUMBBELLS
Ex1: Front Squats
Ex2: Clean & Press – Right
Ex3: Clean & Press – Left
Ex4: RDL To Shrug
Ex5: Suitcase Deadlift To Upright Row
SECTION 3: 4 Minute STEADY STATE PLYO
45 Sec on 15 Sec rest x 2 Sets
- BODYWEIGHT
EX1: Broad Jumps
Ex2: Bunny Hops
SECTION 4: 8 Minute STEADY STATE HIIT
2 Minutes On 1 Minute Sec rest x 3 Sets
- KETTLEBELL
EX1: Alternating Single Arm Kettlebell Swings
SECTION 1: 3 MINUTE ACTIVE WARMUP
45 Seconds On – 15 Seconds Rest – 1 Set
EX1: Squat To Knee Drive
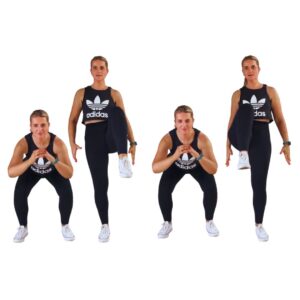
- Stand tall with your feet about shoulder width apart and your toes pointing slightly out.
- Keep your chest lifted and your shoulders relaxed down and back.
- Brace your core as if preparing to be lightly punched in the stomach.
- Begin the squat by sending your hips back and down as if sitting into a chair, keeping your knees tracking over your toes.
- Lower until your thighs are roughly parallel to the ground, or as low as you can while staying comfortable and controlled.
- Keep your heels pressed firmly into the floor and avoid letting your chest collapse forward.
- As you rise back up to standing, drive through your heels and squeeze your glutes at the top.
- Once fully upright, lift one knee toward your chest in a controlled motion, as if you are marching.
- Lower the foot back down into your standing stance.
- Perform another squat, then as you return to standing, drive the opposite knee up toward your chest.
- Continue alternating sides with each rep.
TIPS:
- Focus on staying balanced, moving smoothly, and keeping your torso tall during the knee drive.
- Breathe in as you lower into the squat, breathe out as you rise and lift the knee.
- Move at a pace that allows you to maintain good form, and keep your movements crisp and controlled rather than rushed.
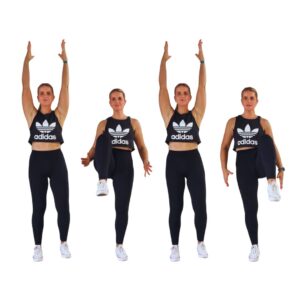
EX2: Alternating Knee Drives
Stand tall with your feet about hip-width apart, toes pointing forward, and your posture tall.
Keep your core engaged and your shoulders relaxed down and back.
Raise both arms straight overhead with your palms facing forward or slightly inward.
Begin the movement by lifting one knee up toward your chest in a strong but controlled marching motion.
At the same time, pull both arms down toward your sides, as if performing a powerful lat pull-down.
Squeeze your shoulder blades down and back as your elbows drive past your ribs. Return your foot to the floor and extend your arms overhead again.
Immediately lift the opposite knee and repeat the same pulling motion with your arms. Continue alternating knees, matching the pull-down with each drive.
TIPS:
- Breathe out as you lift the knee and pull the arms down, breathe in as you return to the starting position.
- Keep your movements sharp and controlled, staying tall through the torso without leaning back or collapsing forward.
- Avoid pulling your arms without engaging your back muscles; think of squeezing your shoulder blades together and down.
- Do not hunch your shoulders up toward your ears.
- Avoid letting your core relax or your torso wobble; keep your midsection firm for balance.
- Do not over-lift the knee if it forces you to lean back or twist your hips.
- Keep the movement steady and rhythmical rather than rushed or jerky.
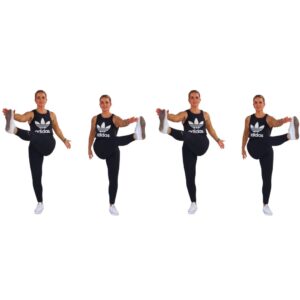
Ex3: Toy Soldiers
Stand tall with your feet hip-width apart, shoulders relaxed, and core engaged.
Extend both arms straight out in front of you at shoulder height, palms facing down.
Keep your torso upright and your gaze forward.
Begin the movement by lifting one leg straight out in front of you, aiming to bring your toes toward your opposite hand in a controlled, kicking motion.
Keep the leg as straight as possible without locking the knee, and avoid leaning back as you lift.
Lower the leg back down with control, then immediately lift the opposite leg toward the other hand.
Continue alternating sides in a smooth, marching kick pattern.
TIPS:
- Exhale as you lift each leg and inhale as you lower it. Move at a steady, rhythmic pace that allows you to keep your posture tall and your movements precise.
- Avoid rounding your back or leaning backward to make the kick higher; the lift should come from your hip while keeping your chest lifted.
- Do not swing the legs wildly or snap the knees; the motion should be controlled and deliberate.
- Avoid letting your arms drop or drift downward—keep them fixed at shoulder height as your target.
- Only kick as high as your flexibility comfortably allows, without forcing or twisting your body.
SECTION 2: 10 MINUTE STRENGTH
45 Seconds On – 15 Seconds Rest – 1 Set
EQUIPMENT: 1 x Heavy Set Dumbbells
Ex1: FRONT SQUAT
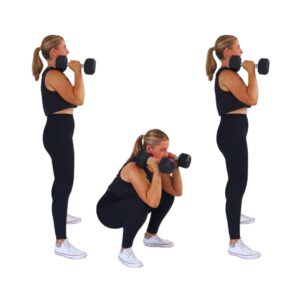
- Stand tall with your feet about shoulder-width apart and your toes slightly turned out.
- Hold a dumbbell in each hand at shoulder height with your palms facing each other, elbows tucked close to your ribs, and wrists straight.
- Keep your chest lifted, shoulders relaxed, and core braced.
- Begin the squat by sending your hips back and down as if sitting into a chair, keeping your elbows under the dumbbells so they don’t drop forward.
- Lower until your thighs are roughly parallel to the ground, or as low as you can while maintaining control and balance.
- Keep your knees tracking over your toes and your heels pressed firmly into the floor.
- Your torso should stay tall without rounding forward under the weight.
- Drive through your heels to rise back up to standing, squeezing your glutes at the top and keeping the dumbbells steady in position.
TIPS:
- Breathe in as you lower into the squat and breathe out as you push back up. Repeat for the desired number of reps, keeping the movement smooth and controlled.
- Avoid letting your knees cave inward or your heels lift off the floor.
- Do not allow the dumbbells to pull your chest forward or cause your wrists to bend back.
- Avoid collapsing your core or arching your lower back—stay braced and upright.
- Do not rush the movement or bounce at the bottom; maintain a steady rhythm with full control through each rep.
Ex2: CLEAN & PRESS – RIGHT
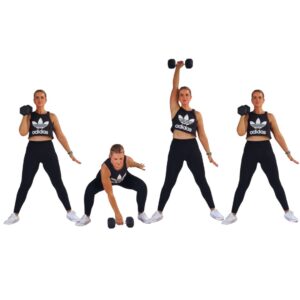
Stand with your feet about shoulder-width apart and a dumbbell on the floor between your feet.
Hinge at your hips and bend your knees to grip the dumbbell with your right hand, palm facing your body, chest lifted, and back straight.
Keep your left arm relaxed by your side or slightly out for balance. Brace your core before starting the lift.
Begin the clean by driving through your heels and extending your hips and knees powerfully to stand tall, using the momentum to bring the dumbbell up along your body.
As the dumbbell rises, shrug your right shoulder slightly and quickly rotate your elbow under to catch the weight at shoulder height in a front-rack position with your palm facing in.
Keep your wrist straight and your core tight as you stabilize.
From here, begin the press by driving the dumbbell overhead.
Push through your feet, brace your core, and press the dumbbell straight up until your arm is fully extended, keeping your elbow close to your ear.
Lower the dumbbell back to your shoulder under control, then return it to the floor by hinging at the hips with a flat back.
Reset and repeat for the desired reps on the right side.
TIPS:
- Exhale as you drive the dumbbell up in both the clean and the press. Inhale as you lower with control.
- Move in one smooth, athletic motion rather than muscling through each phase separately.
- Avoid rounding your back as you pick up or lower the dumbbell.
- Do not let the weight swing far out in front of your body—keep it close during the clean.
- Avoid bending your wrist or letting it collapse under the dumbbell.
- Do not lean excessively to the side when pressing overhead; stay tall and balanced through your torso.
- Avoid rushing the movement; focus on clean form and crisp transitions.
Ex3: CLEAN & PRESS – LEFT

As Above: Opposite Side
Ex4: RDL TO SHRUG
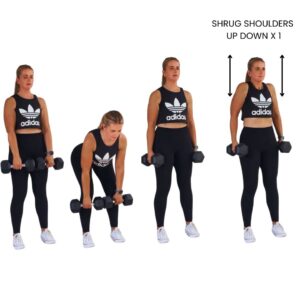
Stand tall with your feet about hip-width apart and a dumbbell in each hand, arms hanging straight down in front of your thighs with palms facing your body.
Keep your shoulders relaxed down and back, your chest open, and your core braced.
Begin the Romanian deadlift by hinging at your hips, sending them back while keeping a slight bend in your knees.
Lower the dumbbells along the front of your legs, keeping them close to your body as you move.
Maintain a flat back and keep your gaze slightly forward or down to avoid rounding your spine.
Lower until you feel a stretch in your hamstrings, usually when the dumbbells reach about mid-shin, then pause briefly.
Drive your hips forward and squeeze your glutes to return to standing.
As you reach the top, immediately perform a shrug by lifting your shoulders up toward your ears in a strong, controlled motion while keeping your arms straight.
Hold the shrug for a brief moment, then lower your shoulders back down before starting the next repetition.
Exhale as you rise and shrug, inhale as you hinge down.
TIPS:
- Keep the motion smooth and controlled throughout, focusing on hinging from the hips rather than bending at the waist.
- Avoid rounding your back or letting your chest collapse during the hinge.
- Do not lock out your knees or let them cave inward.
- Avoid letting the dumbbells drift away from your legs; keep them close for stability and safety.
- Do not yank the shrug or roll your shoulders—lift straight up and lower with control.
- Stay balanced through your whole foot, not just the toes or heels.
Ex5: SUITCASE DEADLIFT TO UPRIGHT ROW
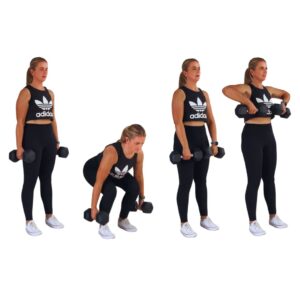
Stand tall with your feet about hip-width apart and a dumbbell in each hand resting by your sides, palms facing your body, as if holding two suitcases.
Keep your shoulders relaxed down and back, chest lifted, and core braced.
Begin the suitcase deadlift by hinging at your hips and bending your knees slightly, lowering the dumbbells down the sides of your legs while keeping them close to your body.
Maintain a flat back and steady core as you lower until the dumbbells reach about mid-shin or just past your knees, depending on your mobility.
Keep your gaze forward or slightly down to avoid rounding your spine.
Drive through your heels and extend your hips and knees to return to standing tall.
From this position, transition directly into the upright row by pulling both dumbbells upward along the front of your body, leading with your elbows.
Lift until your elbows are about shoulder height and the dumbbells are just below your chest.
Pause briefly, then lower the dumbbells back down to your sides in a controlled manner before starting the next repetition.
Exhale as you drive up from the deadlift and lift into the upright row.
Inhale as you hinge down and as you lower the dumbbells back to your sides.
Keep the movement fluid but controlled, linking the deadlift and upright row into one smooth sequence.
TIPS:
- Avoid rounding your back or letting your chest collapse in the deadlift.
- Do not allow the dumbbells to drift far in front of your legs; keep them close to maintain balance.
- Avoid yanking the dumbbells up during the upright row—use a strong but controlled pull.
- Do not let your wrists bend awkwardly; keep them neutral under your elbows.
- Avoid shrugging your shoulders excessively or leaning back as you lift.
- Stay tall and stable throughout the entire movement.
SECTION 3: 4 MINUTE STEADY STATE PLYO
45 Seconds On – 15 Seconds Rest – 2 Sets
EQUIPMENT: Bodyweight
Ex1: BROAD JUMPS
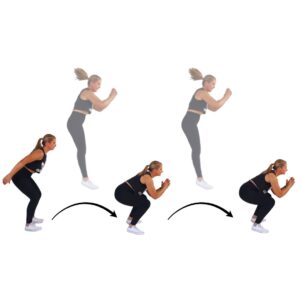
Stand tall with your feet hip-width apart, arms relaxed at your sides, core braced, and chest lifted. Choose a clear space in front of you.
Begin by hinging slightly at the hips and bending your knees into a quarter squat.
Swing your arms back, then drive them forward explosively as you push hard through your legs to jump forward as far as you can.
Land softly on both feet, knees bent, hips back, and chest tall to absorb the impact.
Immediately reset into another quarter squat and perform a second broad jump forward, again using your arms to drive and keeping your landing controlled.
Once you complete the two forward jumps, quickly turn around to face your starting direction.
Keep the turn light and athletic, staying balanced on your feet.
After the turn, drop into a quarter squat and repeat two broad jumps back toward your starting point with the same controlled landings.
Exhale as you jump, inhale as you reset between landings.
Focus on staying low, balanced, and springy while keeping your chest lifted and core strong.
TIPS:
- Avoid landing stiff-legged or with your knees caving inward.
- Do not let your chest collapse forward or your back round.
- Avoid jumping flat-footed—push through the whole foot but drive explosively from your heels and balls of the feet.
- Do not rush the turn; keep it quick but controlled so you are stable before the next jump.
- Avoid letting your arms hang; use them powerfully to maximize distance and rhythm.
Ex2: BUNNY HOPS

Stand with your feet together, knees slightly bent, and core engaged.
Keep your chest lifted, shoulders relaxed, and arms bent in front of your body ready to help with balance.
Begin the movement by pushing off both feet and hopping laterally to the right, staying in the same general spot rather than traveling forward or backward.
Land softly on the balls of your feet with knees slightly bent to absorb impact.
Immediately hop to the left with the same control and balance, keeping your feet together and your torso upright.
Continue hopping side to side in a rhythmic, controlled motion.
Exhale as you push off and hop, inhale as you land and prepare for the next jump.
Focus on staying light on your feet, keeping your core tight, and using your arms slightly for balance.
TIPS:
- Avoid landing stiff-legged or letting your knees collapse inward.
- Do not lean excessively to one side or let your chest drop forward.
- Avoid hopping too far, which can throw off your balance—stay in a controlled range.
- Do not let your feet separate too far on landing; keep them close to maintain stability and rhythm.
- Keep movements smooth rather than choppy or rushed.
SECTION 4: 8 MINUTE STEADY STATE HIIT
2 Minutes On – 1 Minute Rest – 3 Sets
*120 sec on 60 sec rest – 3 sets*
EQUIPMENT: Kettlebell
Ex1: Alternating Single Arm Kettlebell Swings
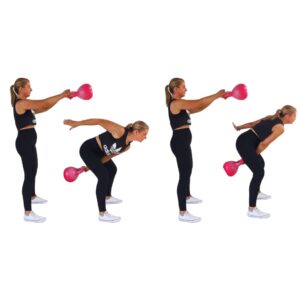
Stand with your feet slightly wider than hip-width apart, toes pointing slightly outward, and a kettlebell on the floor in front of you.
Hinge at your hips with a slight bend in your knees, chest lifted, back flat, and core engaged.
Grip the kettlebell with your right hand, palm facing your body, and prepare to swing.
Begin the swing by driving your hips forward explosively, using the power from your glutes and hamstrings to propel the kettlebell upward.
Keep your right arm straight but relaxed, letting the kettlebell swing toward shoulder height.
As the kettlebell reaches the top of the swing and becomes momentarily weightless, quickly transfer it to your left hand.
Keep your core braced and shoulders down and back during the hand switch.
Allow the kettlebell to swing back down between your legs while hinging at your hips to absorb the momentum.
At the bottom of the swing, drive your hips forward again to propel the kettlebell back up, switching the hand at the top each time.
Continue alternating hands with every swing, keeping a controlled rhythm and generating power from your hips rather than pulling with your arms.
Exhale sharply as you drive the kettlebell upward, inhale as it swings back down.
TIPS:
- Maintain a flat back, chest lifted, and knees slightly bent throughout the exercise.
- Avoid rounding your lower back or leaning forward as the kettlebell swings.
- Do not use your arm to lift the weight; the movement should come from your hips.
- Avoid letting your shoulders rise toward your ears or your core relax.
- Keep the swing controlled—do not let the kettlebell swing wildly or too far forward.
- Ensure your feet stay planted firmly, and knees track over your toes.
- Avoid rushing the hand switch; it should be smooth and coordinated at the top of the swing.